PK125 Pside-Kick: Installation Instructions
Step 1
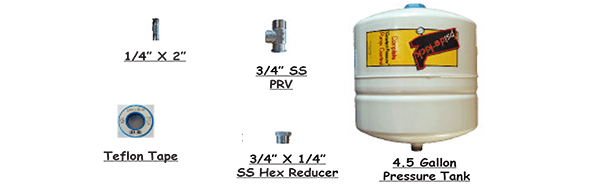
Wrap threads on all male fittings (1/4" x 2", 3/4" x 1/4" reducer bushing, 3/4" PRV, pressure gauge, and pressure tank) with 5-7 layers of teflon tape.
Step 2
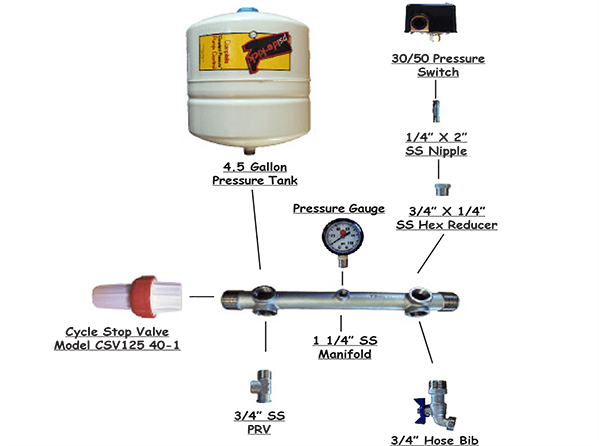
Assemble the valve/manifold as shown. Be sure to thread the manifold on to the pressure tank last. The PRV will need to be plumbed to a drain or outside. If mounting to the wall, do not install pressure tank until manifold has been mounted to wall.
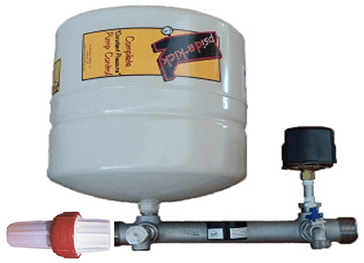
Step 3 (Fully Assembled Kit)
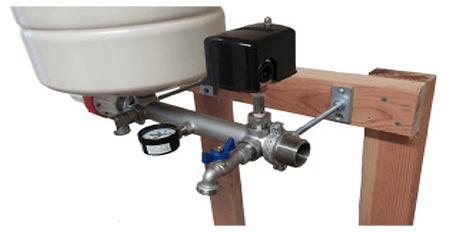
Step 4 (If Mounting to a Wall)
Mount assembly to wall stud.
- Re-attach clamps/pvc spacers and all thread bolts to the wall bracket. Tighten lock nuts.
- Tighten the clamp bolts for stability.
Note: Kit can be installed in any position...from tank up to tank down.
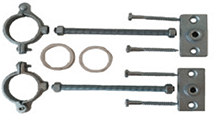
Wall mount kit includes:
- (2) Wall Brackets
- (2) All Thread 3/8" x 6" Bolts
- (4) 3/8" Lock Nuts
- (2) Clamps
- (2) PVC Spacers
- (2) Clamp Bolts
- (4) Wall Screws
Testing the System
Important Note: Be sure all pipe fittings between the pump and the Pside-Kick® are rated to handle the maximum pressure the pump can build at shut off or dead head.
-
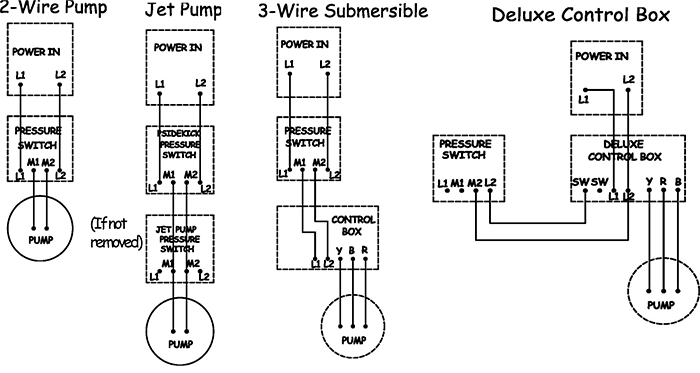
Before attaching system pipe to the Pside-Kick®, attach power wire to pressure switch and pump as per pressure switch wiring diagrams below and run pump until water is clear so that you don't fill up the kit with debris.
- Once the water being pumped is clean, connect the pump discharge piping to the intake of the CSV125 (see direction of flow arrow on valve casting).
- Open your hose bib or faucet to a 2-3 gpm demand or flow. Turn on the pump (if there are any leaks, tighten fittings as necessary).
- Run pump until air is out of the system and check to make sure the Cycle Stop Valve is holding approximately 40 PSI and the pump does not cycle off (the pump stays running).
- Close your hose bib/faucet (it should take your pump approximately 20-30 seconds to turn off at 50 PSI). After the pump turns off, open your hose bib/faucet again to a 2-3 gpm flow. The pressure should begin to drop as the pressure tank empties. Once system pressure drops to 30 PSI, the pump should come back on. Once the pressure reaches 40 PSI, the CSV125 will begin to control the pump and the pressure should stop rising and hold constant as long as a demand of more than 1 gpm is being used.

Note: Pressure rating of pipe installed before the Pside-Kick® must be rated to handle the maximum head or pressure that your pump can build.
Optional: If you have leaks or extended water usage of less than 1 gpm, add an additional pressure tank anywhere in your system after the Cycle Stop Valve is recommended.